Administrator profiles are used for team members who need access to manage your Deskworks account, such as reservations, billing, member profiles, reporting, etc.
This article walks through how to create a new Administrator profile in Deskworks, assign location access, choose a role, manage notifications, and send the new admin their login information.
Skip to How to Remove an Administrator Profile →
How to Set Up an Administrator Profile
Step 1: Add New Administrator
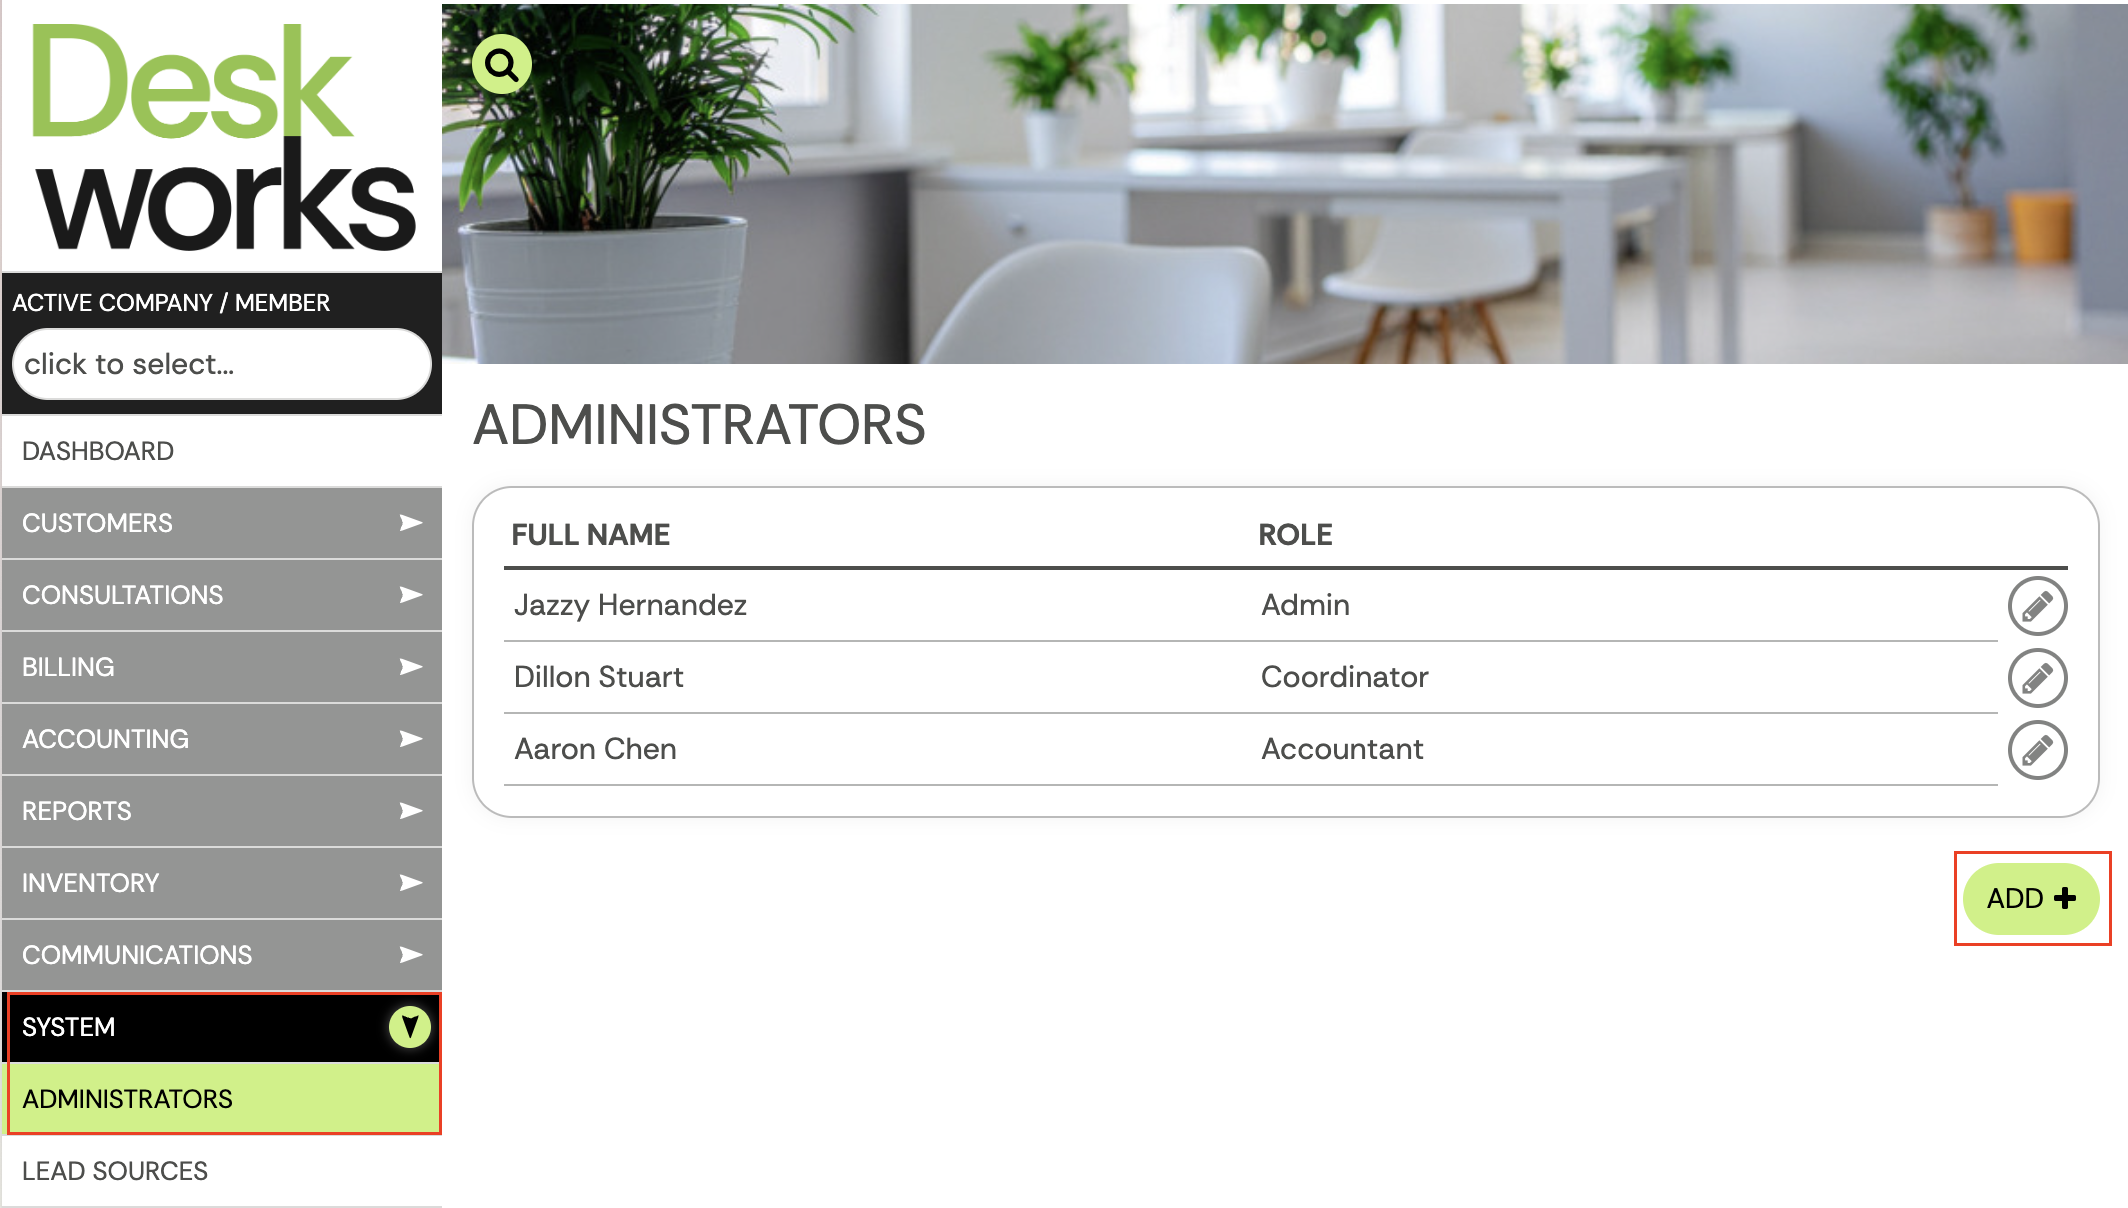
Log into Deskworks and go to:
- System > Administrators. You'll see a list of all current administrators in your account
- Click Add+ at the bottom of the page
Step 2: Enter Profile Information
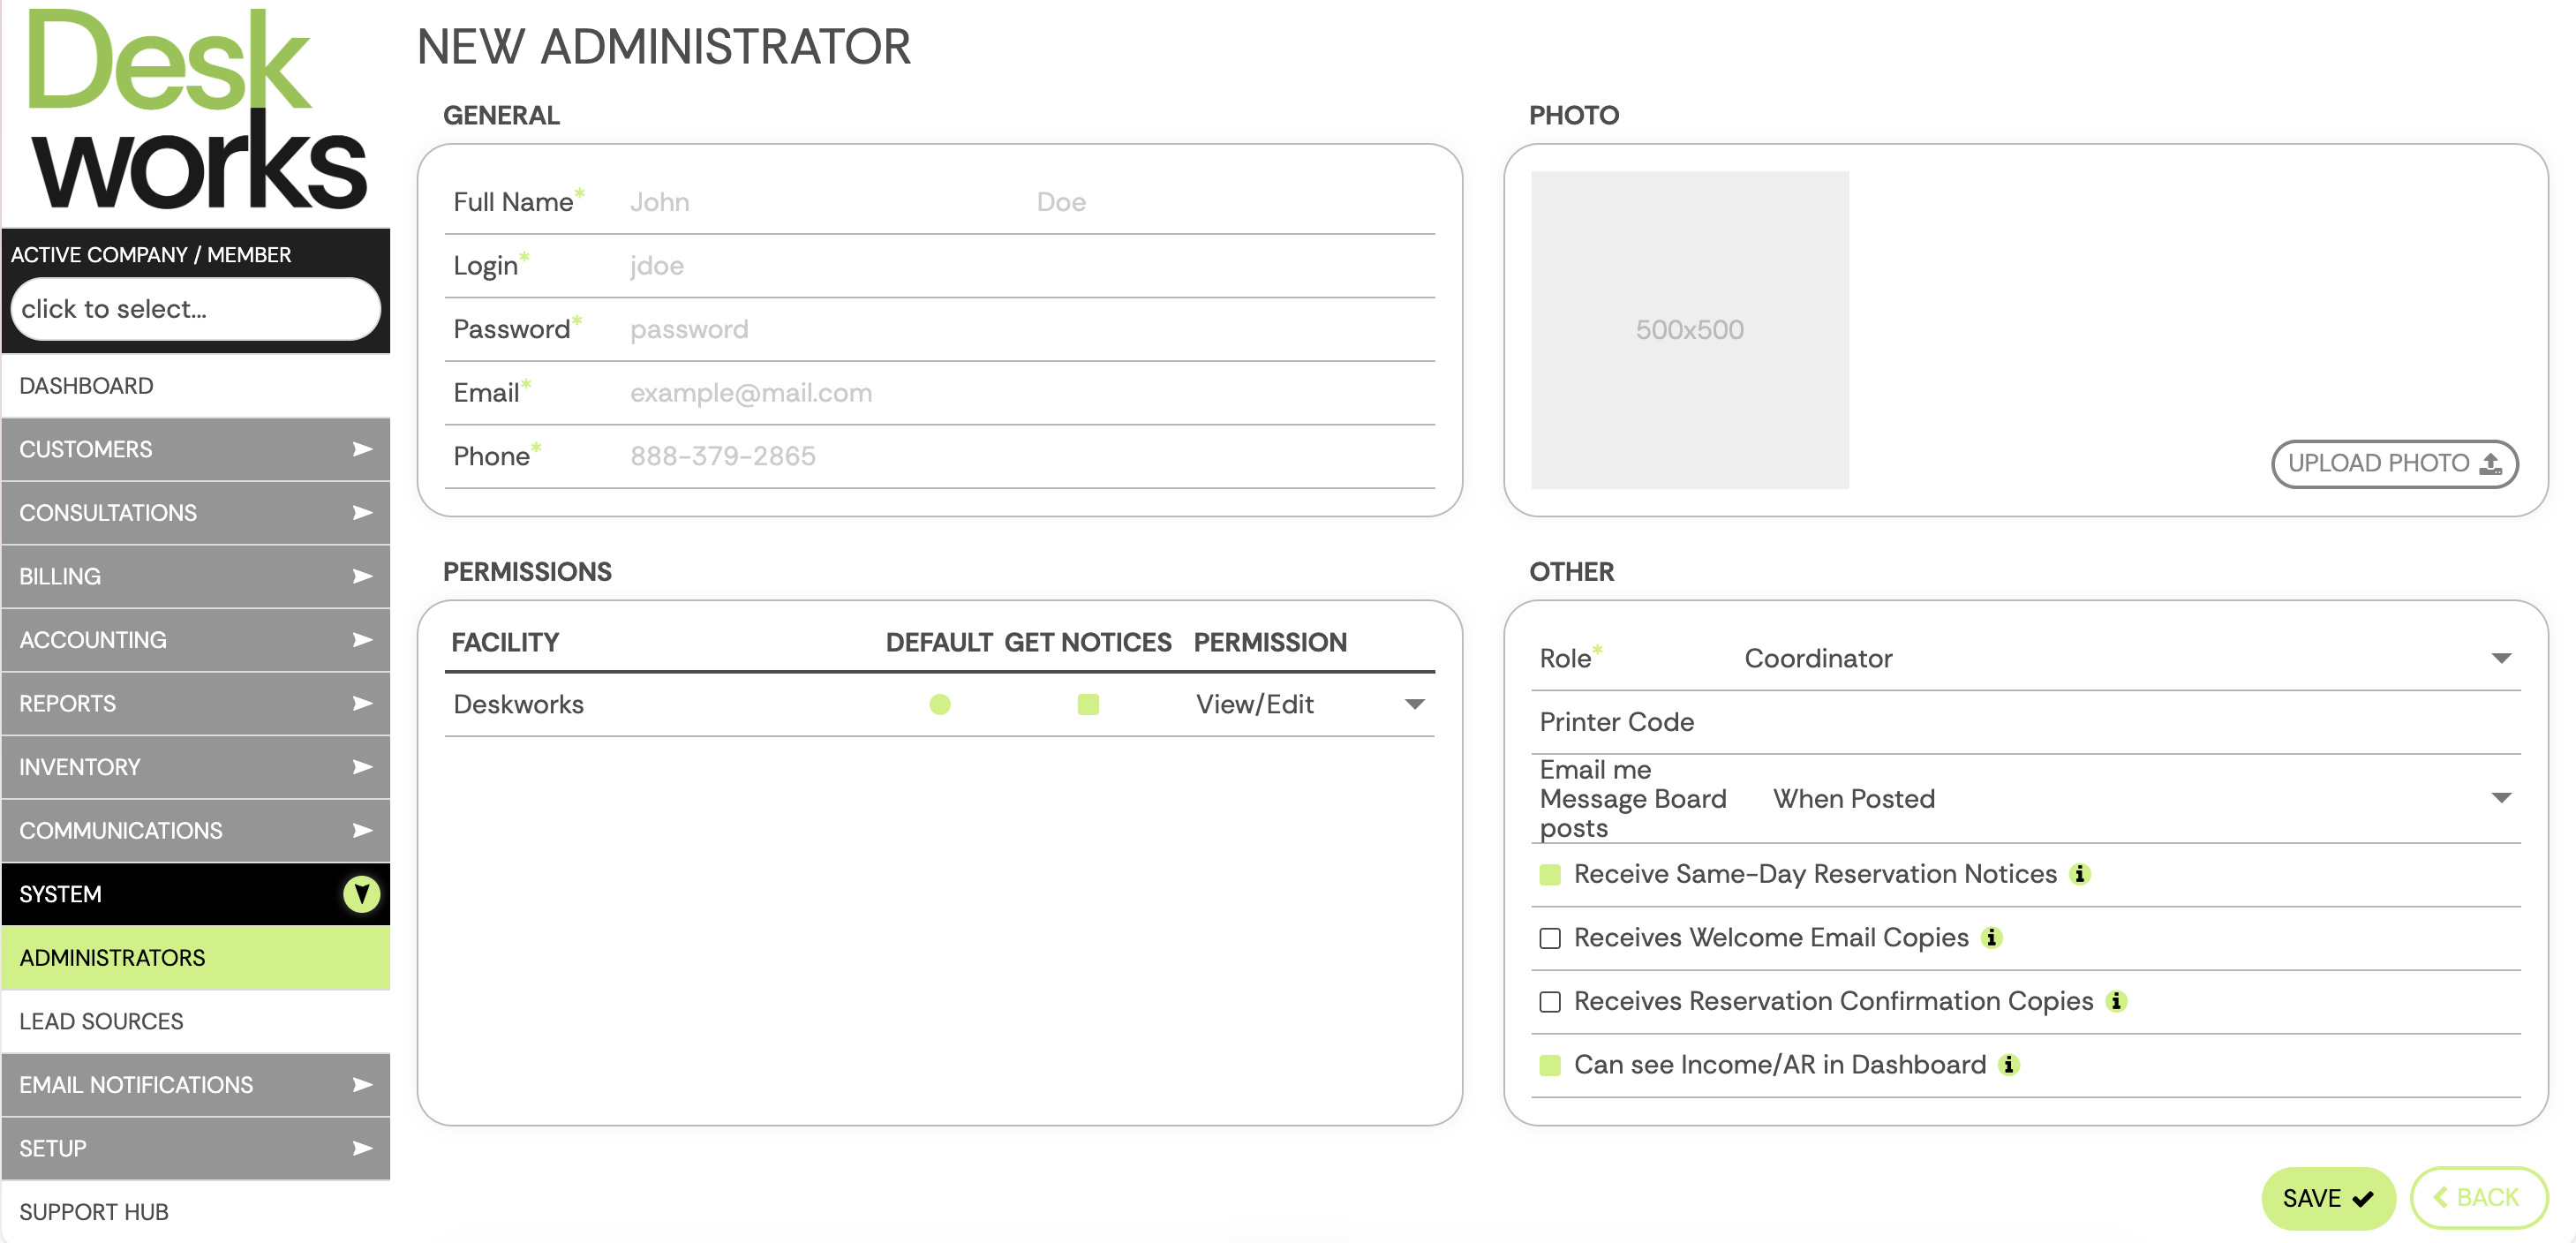
In the "General" section, fill in all required fields:
- First and last name
- Login
- Password
- Email address
- Phone number
Optional: Upload a profile photo
- If using Intelligent Network Check-in, the photo will appear next to the administrator's name on the Dashboard when checked-in on the WiFi.
- For best results, use a square image 500 x 500 pixels.
Step 3: Set Facility Notices and Permissions
In the "Permissions" section, you will see a list of the facilities in your Deskworks account.
- Under Get Notices, check the box for any facility where this admin should receive notices.
- Notices include invoices, receipts, reservation confirmations, credit card expirations, renewals, etc.
- Under Permissions, choose the appropriate permission level for each facility.
- None: The admin will not see this facility when they are logged in. Use this for locations the admin does not need to access.
- View/Edit: The admin will have access to view and edit information for that facility based on their assigned role. Use this for locations the admin actively manages or supports.
- View Profile and Calendar Only: The admin can see that the facility exists, but they can only view user profile information and calendar information for that location. This can be helpful for teams with multiple locations where a manager may need limited visibility into another facility’s calendar or member profiles.
Step 4: Select a Role
In the "Other" section, choose the Administrators role. Roles control which specific pages and features a user can view or interact with.
Standard roles include:
- Accountant: Typically used for accountants, bookkeepers, or other finance related roles who need limited access to specific billing feature, reports and accounting-related tasks.
- Coordinator: Typically used for a community manager or team member who needs access to day-to-day operations, but may not need full system access.
- Admin: The highest standard access level. This is usually for team members who need broad access across the system.
Some Deskworks accounts may also have a Management role or other custom roles.
Roles and permissions can be customized under Setup > Tasks. For more details, see the related article on How to Set Up Permissions for Individual Administrators →
Step 5: Optional Notifications and Settings
In the "Other" section, there are also several optional fields:
- Printer code (tracking)
- Message board posts - select frequency (notification)
- Same-day reservation notices (notification)
- Welcome email copies (notification)
- Reservation confirmation copies (notification)
- Show Income and A/R on the Dashboard (permissions)
Note: To receive the optional email notifications in the "Other" section, "Get Notices" must also be turned on.
Step 6: Save
Once the profile is complete, click Save.
Step 7: Share Login Information
After saving the profile, you can give the new administrator their login credentials.
If their role allows access to the Administrators page, they can update their profile and password by going to System > Administrators.
Administrators can only see and manage roles at their permission level or lower.
How to Remove an Administrator Profile
- Go to System > Administrators
- Click the pencil icon to edit the profile
- Click Delete
Deleting the admin from this page does not completely remove the person from Deskworks. It converts them to a non-member profile in your system.
To remove them completely:
- Locate their non-member profile
- Go to Members > View/Edit Profile
- Scroll down to the Membership section and click "Delete User"
Was this article helpful?
That’s Great!
Thank you for your feedback
Sorry! We couldn't be helpful
Thank you for your feedback
Feedback sent
We appreciate your effort and will try to fix the article